Pages

Wednesday, September 29, 2010

How To : Host Silverlight Xap in Blogger

Hositing Silverlight XAP in Blogger... Aah At last succeded.. Yipeee

I was trying to host silverlight application in blogger from the past two weeks and at last succeded today :) as you can see below.


When i first googled, i found this wonderful post of timheuer which explains about cross-domain hositing of silverlight application in detail.

The big question which i had after reading tim's blog post is, where do i host my xap file as i need to set the XAP mime type on the hosting server, I personally do not own any hosting space nor any domain.
In the next moment i started searching for free file hosting providers, which can provide me a direct link for hosted file with file extension so that i can refer to the xap file directly. I tried around 5 different file hosting servers but i couldn't figure out how to set the mime extension type on that perticular server to render my silverlight xap on my blogger blog.

In my 6th attempt to host xap, i have tried with xtreemhost file hosting which has not only provided me with a direct link to the hosted file but also provided access to the .htaccess file where i could add my MIME types.

So here are few things which we need to take care before hosting a silverlight application on to blog:

  • Make sure you have added the EnableHtmlAccess parameter to the object tag in html
    <param name="enableHtmlAccess" value="true" />
  • Make sure you have set ExternalCallersFromCrossDomain to ScriptableOnly in the AppManifest.xml file in silverlight project
    <Deployment xmlns="http://schemas.microsoft.com/client/2007/deployment"
            xmlns:x="http://schemas.microsoft.com/winfx/2006/xaml"
        ExternalCallersFromCrossDomain="ScriptableOnly">
        <Deployment.Parts>
        </Deployment.Parts>
    </Deployment>
    
  • Add the MIME types on the hosting server(if not added already :)).
    On XtreemHost this is how i added the MIME types, In the /htdocs directory i have created a new file with name .htaccess and added the below mentioned two lines in the .htaccess file
    AddType application/x-silverlight-app .xap
    AddType application/xaml+xml .xaml

Here onwards everything should be straight-forward and simple, upload your xap file on to the file hosting server and set the source value in the object tag to the hosted xap file, below is the object tag for the above rendered silverlight application

<script type="text/javascript" src="http://xthkranthi.xtreemhost.com/Silverlight.js"></script>
<div id="silverlightControlHost" Style="height:100px;width:100px;">
<object data="data:application/x-silverlight-2," type="application/x-silverlight-2" width="100%" height="100%">     
<param name="source" value="http://xthkranthi.xtreemhost.com/Test.xap"/>
<param name="onError" value="onSilverlightError" />
<param name="background" value="white" />
<param name="minRuntimeVersion" value="4.0.50401.0" />
<param name="autoUpgrade" value="true" />
<param name="enableHtmlAccess" value="true" />
<a href="http://go.microsoft.com/fwlink/?LinkID=149156&v=4.0.50401.0" style="text-decoration:none">       <img src="http://go.microsoft.com/fwlink/?LinkId=161376" alt="Get Microsoft Silverlight" style="border-style:none"/>     </a>      </object><iframe id="_sl_historyFrame" style="visibility:hidden;height:0px;width:0px;border:0px"></iframe>
</div>

Done.. That should do it!!!! If nothing went wrong then your silverlight application should be on you blog as mine :).

Hope this helps someone.. comments are always welcome and please let me know if you have any issues in loading silverlight applicaiton on your blog.

Wednesday, September 15, 2010

Workaround for showing a tooltip for disabled control in silverlight

In WPF we have ShowOnDisabled property for ToolTipService, which displays the tooltip even the control is in the disabled state. Intrestingly, i have'nt found this property in silverlight and need to implement this in silvelright.

On googling a bit i found this post in silverlight fourms which says
"Having the ToolTip not show on a disabled element is by design, and compatible with WPF. We realize that Silverlight lacks other means to provide ToolTips on disabled items (such as ToolTipService.ShowOnDisabled), and will be looking into it." as is.

Here is the workaround which i found while implementing this functionalty.
<Border HorizontalAlignment="Center" VerticalAlignment="Center" Background="Transparent" >
     <ToolTipService.ToolTip>
          <ToolTip Content="Tool Tip"/>
     </ToolTipService.ToolTip>                        
          <Button x:Name="button" Width="75" Content="Button" IsEnabled="False" />
</Border>

My first thought to show the tooltip, was to wrap the control (Button) inside another control (Border) and add the tooltip to the parent (Border) control. As we will enable and disable the child control, parent control displays the tooltip.

Unfortunately this did not work. When Button is disabled, Border control is not showing up the tooltip. My guess was Border control is not able to find its child controls when they are disabled, then i tried placing a rectangle with 0.1 opacity beneath the button, which makes sure that border has content irrespective of the enabled state of the button.

[Updating post as some of my friends suggested a better solution, and the good thing was my first thought was not wrong, just making wrapper control (Border) background to transparent is enough.. which works like a charm.. i've updated the code snippet accordingly..]

This was my workaround, If anyone finds a better way please post a comment with that solution. As that may help somebody like me :).

Hope this post helps some one.

Thursday, September 9, 2010

How To : Load Multiple XAP files in Silverlight Application

Currently i am working on a project where i had a requirement to load multiple xap files in a silverlight application, or let me keep this way i need to load xap files OnDemand.
I was going through this article on msdn where it explains about "how to load assemblies on demand", before reading this article i really had no idea of how to load multiple xap files, but now i have done that yipee... :)
I just want to blog a bit about how to load multiple xap files in silvelright application, and also share some sample application which demonstrates this. As usual you can find the source code the end of this blog post.

To get started with this sample i've created a silverlight project and added two silverlight class libraries, now my solution looks as shown below


First let us check out how to load a single xap file, the below code shows how to read a xap file and read the dll file for the perticular class for which we want to create the instance and returns that perticular instance.
The Things to check out in the below code snippet are the two private variables:
  • applicationName - The name of the xap file with out extension.
  • control - The class in the above mentioned application for which you want to create instance.
public partial class MainPage : UserControl
    {
        string applicationName = "SilverlightApplication1";
        string control = "Control";

        public MainPage()
        {
            InitializeComponent();
            WebClient wc = new WebClient();
            wc.OpenReadCompleted += new OpenReadCompletedEventHandler(wc_OpenReadCompleted);
            wc.OpenReadAsync(new Uri("SilverlightApplication1.xap", UriKind.Relative));
        }

        void wc_OpenReadCompleted(object sender, OpenReadCompletedEventArgs e)
        {
            StreamResourceInfo resourceInfoDLL = Application.GetResourceStream(new StreamResourceInfo(e.Result, null),
                                                 new Uri(string.Format("{0}.dll", applicationName), UriKind.Relative));
            AssemblyPart assemblyPart = new AssemblyPart();
            Assembly assembly = assemblyPart.Load(resourceInfoDLL.Stream);
            UIElement element = assembly.CreateInstance(string.Format("{0}.{1}", applicationName, control)) as UIElement;
            LayoutRoot.Children.Add(element);
        }
    }
Using the webclient we can read the xap file and load its content in the silverlight applicaiton as shown above, I have added the "Control" instance, which is a user control in SilverlightApplication1 project to the LayoutRoot, which is a grid in our Main Silverlight application.
If we want to load multiple xaps then we need to create multiple instances of webclient and load xap files, The final output of the shared source code would look like the below image.

At last here is the Source Code for this particular blog post, to load xap files ondemand.
Hope this post helps some one in need... :)

Monday, August 30, 2010

How To : Communicate between two user-controls using Event Aggregator

I found many posts in the asp.net, silverlight.net fourms regarding communication between user-controls, so i thought to blog a bit about communication between user-controls using Event Aggregator in silverlight which i found is the best way to communicate.

The main advantage for using an event aggregator to communicate between user-controls is, it removes the tight coupling between a publisher and a subscriber, by which a publisher/subscriber can evolve independently. Pre-requisites for understanding this blog post is to have a bit understanding of Event Aggregator.

Live Demo : Event Aggregator Sample
Source Code: At the end of this post :).

In this post i will explain how two user-controls can pass messages between them using event aggregator, consider a simple chat scenario where one user types-in some message and sends to to another user and vice-versa. My Visual Studio Solution looks as shown below, things to observe are
  • Microsoft Practices Composite dll's which are required for implementing the event aggregation
  • EventAggregator.cs which implements the interface IEventAggregator. (Note: will share the enitre source code at the end of this blog post :) )
  • "Kranthi.xaml" and "Kiran.xaml", two user controls which communicate using event aggregator.


Both the user controls have same functionality to implement. Lets see how the "Kranthi.xaml" user-control UI is likely to be, it contains following:
  • Text Box, where user enters message to publish.
  • Button, used to publish the entered message in TextBox.
  • ListBox, to display the received messages from the subscribed event.
"Kiran.xaml" user-control also has the same controls, so now i am ready with a sample user-interface which looks like below


So now i am defining two events to communicate
  1. MessageToKiran event is published by "Kranthi.xaml" and is subscribed by "Kiran.xaml".
  2. MessageToKranthi event is published by "Kiran.xaml" and is subscribed by "Kranthi.xaml".
Whenever an event is published, all the subscribers for that event get notified regarding the published message.
namespace EventAggregationSample
{
    public class MessageToKranthi : PresentationEvent<string> { }

    public class MessageToKiran : PresentationEvent<string> { }
}
Subscribing to Event:
Before subscribing or publishing a message, we need to instantiate EventAggregator and Subscribe to event as shown below
IEventAggregator Aggregator { get; set; }

//Constructor
public Kranthi()
{
    InitializeComponent();
    Aggregator = new EventAggregator();
    Aggregator.Subscribe<MessageToKranthi, string>(OnMessageToKiran);
}

public void OnMessageToKiran(PresentationEvent<string> e)
{
    ListBoxItem item = new ListBoxItem();
    item.Content = e.Payload;
    lbMessages.Items.Add(item);
}
In the Constructor, I've initialized the Aggregator and subscribed to the event MessageToKranthi, which has a payload of type string(which is our message). Whenever any user-control publishes MessageToKranthi event then "OnMessageToKiran" code gets executed.

Publishing an Event:
We can use event aggregator to send message for all subscribers of that event as below
Aggregator.SendMessage<MessageToKiran, string>(
    new MessageToKiran { Payload = tbMessage.Text }
    );
The above code publishes "MessageToKiran" event with the payload of the user entered text, this text is passed as payload to all the subscribers for this event.

To Complete the Communication, two user-controls should perform the following activities
  • Kranthi.xaml - Publish the event "MessageToKiran" and Subscribe for the event "MessageToKranthi"
  • Kiran.xaml - Publish the event "MessageToKranthi" and Subscribe for the event "MessageToKiran"
Finally here is the link for the source code which demonstrates the event aggregation sample. hope this helps someone.. :)

Sunday, August 29, 2010

How To : Publish Code Snippets in Blog in 3 Steps

Most of my posts in my blog are related to .NET technology, as i am a .NET developer. One of the most frequent question for a developer who has just started to blog is "How to publish code snippet in blog". I too had the same question and after googling a bit and found couple of articles which i found useful, i just want to gather all useful stuff togather as explained below.

Login to your Blogger Account and Click on Design link and Click on Edit HTML, which is highlighted in the image shown below.


Now follow these simple 3 steps to publish code snippets in blogger:

  1. Search for "/head" in the HTML template and paste the below script tags above that. [Note]: Check "Expand Widget Templates" if search result is not found


    <script src='http://syntaxhighlighter.googlecode.com/svn/trunk/Scripts/shCore.js' type='text/javascript'/>
    <script src='http://syntaxhighlighter.googlecode.com/svn/trunk/Scripts/shBrushCpp.js' type='text/javascript'/>
    <script src='http://syntaxhighlighter.googlecode.com/svn/trunk/Scripts/shBrushCSharp.js' type='text/javascript'/>
    <script src='http://syntaxhighlighter.googlecode.com/svn/trunk/Scripts/shBrushCss.js' type='text/javascript'/>
    <script src='http://syntaxhighlighter.googlecode.com/svn/trunk/Scripts/shBrushJScript.js' type='text/javascript'/>
    <script src='http://syntaxhighlighter.googlecode.com/svn/trunk/Scripts/shBrushSql.js' type='text/javascript'/>
    <script src='http://syntaxhighlighter.googlecode.com/svn/trunk/Scripts/shBrushVb.js' type='text/javascript'/>
    <script src='http://syntaxhighlighter.googlecode.com/svn/trunk/Scripts/shBrushXml.js' type='text/javascript'/>
    
  2. Search for "/body" and Paste the below javascript code above "/body"


  3. Paste the below CSS code before "]]></b:skin>" in your HTML Template


    .dp-highlighter
    {
     font-family: "Consolas", "Monaco", "Courier New", Courier, monospace;
     font-size: 12px;
     background-color: #E7E5DC;
     width: 99%;
     overflow: auto;
     margin: 18px 0 18px 0 !important;
     padding-top: 1px; /* adds a little border on top when controls are hidden */
    }
    
    /* clear styles */
    .dp-highlighter ol,
    .dp-highlighter ol li,
    .dp-highlighter ol li span 
    {
     margin: 0;
     padding: 0;
     border: none;
    }
    
    .dp-highlighter a,
    .dp-highlighter a:hover
    {
     background: none;
     border: none;
     padding: 0;
     margin: 0;
    }
    
    .dp-highlighter .bar
    {
     padding-left: 45px;
    }
    
    .dp-highlighter.collapsed .bar,
    .dp-highlighter.nogutter .bar
    {
     padding-left: 0px;
    }
    
    .dp-highlighter ol
    {
     list-style: decimal; /* for ie */
     background-color: #fff;
     margin: 0px 0px 1px 45px !important; /* 1px bottom margin seems to fix occasional Firefox scrolling */
     padding: 0px;
     color: #5C5C5C;
    }
    
    .dp-highlighter.nogutter ol,
    .dp-highlighter.nogutter ol li
    {
     list-style: none !important;
     margin-left: 0px !important;
    }
    
    .dp-highlighter ol li,
    .dp-highlighter .columns div
    {
     list-style: decimal-leading-zero; /* better look for others, override cascade from OL */
     list-style-position: outside !important;
     border-left: 3px solid #6CE26C;
     background-color: #F8F8F8;
     color: #5C5C5C;
     padding: 0 3px 0 10px !important;
     margin: 0 !important;
     line-height: 14px;
    }
    
    .dp-highlighter.nogutter ol li,
    .dp-highlighter.nogutter .columns div
    {
     border: 0;
    }
    
    .dp-highlighter .columns
    {
     background-color: #F8F8F8;
     color: gray;
     overflow: hidden;
     width: 100%;
    }
    
    .dp-highlighter .columns div
    {
     padding-bottom: 5px;
    }
    
    .dp-highlighter ol li.alt
    {
     background-color: #FFF;
     color: inherit;
    }
    
    .dp-highlighter ol li span
    {
     color: black;
     background-color: inherit;
    }
    
    /* Adjust some properties when collapsed */
    
    .dp-highlighter.collapsed ol
    {
     margin: 0px;
    }
    
    .dp-highlighter.collapsed ol li
    {
     display: none;
    }
    
    /* Additional modifications when in print-view */
    
    .dp-highlighter.printing
    {
     border: none;
    }
    
    .dp-highlighter.printing .tools
    {
     display: none !important;
    }
    
    .dp-highlighter.printing li
    {
     display: list-item !important;
    }
    
    /* Styles for the tools */
    
    .dp-highlighter .tools
    {
     padding: 3px 8px 3px 10px;
     font: 9px Verdana, Geneva, Arial, Helvetica, sans-serif;
     color: silver;
     background-color: #f8f8f8;
     padding-bottom: 10px;
     border-left: 3px solid #6CE26C;
    }
    
    .dp-highlighter.nogutter .tools
    {
     border-left: 0;
    }
    
    .dp-highlighter.collapsed .tools
    {
     border-bottom: 0;
    }
    
    .dp-highlighter .tools a
    {
     font-size: 9px;
     color: #a0a0a0;
     background-color: inherit;
     text-decoration: none;
     margin-right: 10px;
    }
    
    .dp-highlighter .tools a:hover
    {
     color: red;
     background-color: inherit;
     text-decoration: underline;
    }
    
    /* About dialog styles */
    
    .dp-about { background-color: #fff; color: #333; margin: 0px; padding: 0px; }
    .dp-about table { width: 100%; height: 100%; font-size: 11px; font-family: Tahoma, Verdana, Arial, sans-serif !important; }
    .dp-about td { padding: 10px; vertical-align: top; }
    .dp-about .copy { border-bottom: 1px solid #ACA899; height: 95%; }
    .dp-about .title { color: red; background-color: inherit; font-weight: bold; }
    .dp-about .para { margin: 0 0 4px 0; }
    .dp-about .footer { background-color: #ECEADB; color: #333; border-top: 1px solid #fff; text-align: right; }
    .dp-about .close { font-size: 11px; font-family: Tahoma, Verdana, Arial, sans-serif !important; background-color: #ECEADB; color: #333; width: 60px; height: 22px; }
    
    /* Language specific styles */
    
    .dp-highlighter .comment, .dp-highlighter .comments { color: #008200; background-color: inherit; }
    .dp-highlighter .string { color: blue; background-color: inherit; }
    .dp-highlighter .keyword { color: #069; font-weight: bold; background-color: inherit; }
    .dp-highlighter .preprocessor { color: gray; background-color: inherit; }
    

Done!!!! :) Those were the changes to be made in the HTML Template and now you can start posting your source code in blogger as shown below:
While writing a post, select "Edit HTML" to write the blog post in html mode and wrap your source code snippet with a pre tag and add name="code" and class="<your source code language>", after wrapping your source code it should look like something below
<pre name="code" class="csharp">
//your source code goes here
</pre>

Here is the list of supported languages, shamelessly copied from here:

LanguageAliases
C++cppcc++
C#c#c-sharpcsharp
CSScss
Delphidelphipascal
Javajava
Java Scriptjsjscriptjavascript
PHPphp
Pythonpypython
Rubyrbrubyrailsror
Sqlsql
VBvbvb.net
XML/HTMLxmlhtmlxhtmlxslt

Hope this helps someone :)

References/Useful Links:
http://urenjoy.blogspot.com/2008/10/publish-source-code-in-blogger.html
http://pleasemakeanote.blogspot.com/2008/06/posting-source-code-in-blogger.html

Monday, August 23, 2010

The specified named connection is either not found in the configuration, not intended to be used with the EntityClient provider, or not valid.

I was working on entity framework to access the underlying data using data access layer. I've added EDMX file, generated the required entity classes and was ready to go.

When i ran the application, i have encountered with "The specified named connection is either not found in the configuration, not intended to be used with the EntityClient provider, or not valid." error. I was really confused, as I have not modified the connection string manually. Entity framework generated edmx file and updated the webconfig file with the connection string.

After spending a good amount of time on this issue, i found out the solution for this issue and is explained below:

Problem: The created entity model .edmx file is in a class library project which i have created for accessing the data and the connection string is generated in the web.config file in the same class library project. When the application is running, the application checks for the connection string in the web.config file residing in the website project and it is not able to find there. This is the cause for the issue.

Solution: Moving the connection string from newly created class library project to the website project.
Hope this helps someone. :)

Wednesday, August 11, 2010

Message: Failed to download a platform extension: System.ComponentModel.DataAnnotations.zip

I was trying to reduce the silverlight xap file size and selected "Reduce XAP size by using applicaiton library caching" to true in Silverlight project properties, which reduced the size of xap file by caching the assemblies.

When i ran the application, i've encountered "Message: Failed to download a platform extension: System.ComponentModel.DataAnnotations.zip" error and was checking out the cause for this error. At last found that this error is occurring after setting the "Reduce xap file size" to true.

Solution: Changed the startup project from Silverlight project to Website project in silverlight project properties.

For more information on Silverlight 3 Cached Assemblies check this link

Friday, June 18, 2010

How To Create and Consume REST Web Service using WCF

Recently i was asked to create a REST web service using WCF. So i have asked my best friend google about this.. but didn't get any working solution for that. After a long research i got REST webservice working. So now i would like to share the things which i have learnt while creating a REST webservice

First thing is to add WCF Project to your Solution

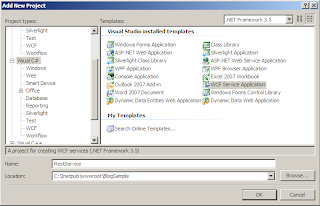
Just right click on the solution and select " ADD -> New Project -> WCF Service Application "

Changes to be done in Web.Config File

By default you will find the end-point binding as "wsHttpBinding", for REST Web service we need to use the end-point as "webHttpBinding".

Steps for making the above changes
Find System.ServiceModel -> behaviours and add the following end-point behaviour


Find the following code in system.servicemodel -> services

....

change it to

....


At this point of time. Build your solution once and verify everything is working properly. To verify, right click on .svc file(By default it will be Service1.svc) and view it in browser. If the service runs with out throwing any error then you are through the first phase of creating the REST Web service.

Now we will get into coding part


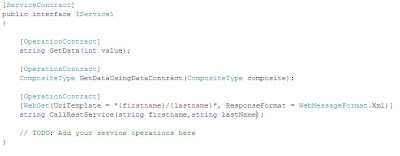
In your WCF Service, find the Interface Iservice.cs, In the Interface Iservice.cs you can define the methods and Uri template for each method,

UriTemplate defines the format of the Url with which we can access that perticular method in the service. We use WebGet method to get the url and match with the UriTemplates in the service. (Note: you need to add reference of System.ServiceModel.Web.dll for WebGet Method)

for example: If you want a method to give your full name by sending FirstName and LastName as parameters, then you can define the UriTemplate as "UriTemplate={firstname}/{lastname}"
where the values in the paranthasis are the parameters for that particular service.
Below you can find the method (CallRestService(string firstname, string lastname)) and its Uri Template.


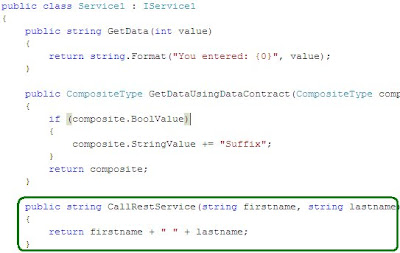
Now you are 1 step away from creating a REST web service, you need to define the method(CallRestService(string firstname, string lastname) in Service1.svc.cs file.


rebuild your solution and thats you have created a REST web service which takes two input parameters and returns a string by concatenating two strings.
try to run your webservice and append two parameters first name and last name then hit enter you will see your full name as response from the webservice

In my case my service is running on localhost port 1908,
http://localhost:1908/Service1.svc

I need to enter parameters in the url to hit that perticular method
http://localhost:1908/Service1.svc/Kranthi/Kiran

yeah.. i got the response from the webservice


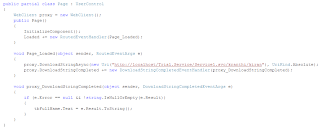
Now we need to call this Webservice from the WebApplication, This will be an easy task for us. As we need to create a proxy for WebClient to call the service and just hit the URL http://localhost:1908/Service1.svc/Kranthi/Kiran and get response


So here on the page loaded event i am calling the webservice using Webclient DownloadStringCompletedAsync function which takes the uri to be hit and UriKind.
In our case we are using Absolute Uri.
On DownloadString completed eventhandler we will be getting our result in the EventArgs. So e.Result contains the response from the service.

So the basic steps to create and consume the webservice are:
1) Add WCF project to your solution
2) Modify the Web.Config file in the service, changing the endpoint behaviors
3) define the UriTemplate in the interface and define the service method in Service.svc.cs file
4)Create a proxy in the web application.
5) Send the request and get the response

Thats it for now.. i will be updating the blog with how to consume the created REST webservice soon.... :)

Wednesday, May 19, 2010

ScrollViewer Scroll Change Event in Silverlight

Today i was working with scrollviewer and surprisingly i did not found a scroll changed event... really got irritated and tried to find a workaround for that and would love to share with you all.
I found two workarounds and the good thing is both of them work :) and are mentioned below.

1st: Catch the scrollbar controls inside the scrollviewer control template and use the scroll event of scrollbar control.

2nd: Create a dependency property which listens the change of Offset properties of ScrollViewer

Here is the sample project created and would be straight forward and is self-explanatory.

Unable to Start Debugging. The Silverlight managed debugging package isn't installed

Recently i got this error while debugging the silverlight application. When i have googled a bit, i found most of the answers as latest developer runtime is not installed. but this was not my problem.

Problem Cause:
i have uninstalled the silverlight browser plugin and reinstalled it. So this was causing the problem


Solution:
i have re-installed the silverlight_tools.exe. this has solved the problem

Sunday, May 16, 2010

Creating a smooth sliding horizontal menu using JQuery

For this example we need the latest version of Jquery which is available at http://Jquery.com
here goes our HTML Code:
and the CSS:
#slider{
height:122px;
clear:both;
margin:30px 10px 10px;
background:#E6F1FE;}

#slider ul{
list-style-type:none;
height:122px;
overflow:hidden;}

#slider ul li{
display:inline;
float:left;
width:122px;}

#slider ul li a:hover{
cursor:pointer;}

#homeSlider ul li img{
display:block;
float:left;
border:solid 1px #2B78B0;}

#slider .current{
width:500px;}
Now here comes the magic(JQuery!!)
You are just 5 lines away from creating a smooth sliding Horizontal menu.
$(document).ready(function(){
var minWidth = 122;
var maxWidth = 500;
$(”#slider ul li”).hover(function(){
$(”#slider ul li”).animate(
{width:minWidth+”px”},{queue:false,duration:”slow” }
);
$(this).animate(
{width:maxWidth+”px”},{queue:false,duration:”slow” }
);
});

Now lets understand the JQuery code
1) $(“#slider ul li”).hover(function(){
-> this line binds hover event to all the LI elements after the DOM is loaded
2) $(“#slider ul li”).animate({width: minWidth +“px”}, { queue:false, duration:“slow” });
-> In above line we are animating the width of all the LI elements to minWidth with slow transition and making the queue false as we have to make width of the hovered LI element to maxWidth.
3) $(this).animate({width: maxWidth +“px”}, { queue:false, duration:”slow” });
-> In above line $(this) refers to the hovered element, we are animating the width of the hovered element to max width a slow transition as to create a smooth effect.

Thats it, with this you should be able to create a smooth horizontal menu with JQuery..

Bye for now… be updated to my blog as there are many more to come :)

Saturday, May 15, 2010

"Hello World" Blogger Post :)

Hello all,
By reading the title of this post you may think what non-sense is this, just to say a simple hello to this world does the author need a blog and a blog post.
But some of you(like me) may be hearing this word very frequently and love to hear that when new technologies or new versions of existing technologies emerge.

Now some of you may get an idea of what will this blog be all about. Yes this is yet another blog by Microsoft .Net developer to share his ideas, learnings and solutions on almost all of the microsoft technologies.

And coming back to "Hello World", If you are not a developer/IT guy then you need the definition of this word "Hello World". This word is used in almost all of the sample projects demonstrated by the authors of new technologies and these projects would be really helpful to the developers who are learning those technologies.

Now it's time to introduce myself to this world and say hello:).
This is Kranthi Kiran from Hyderabad, India working in software field from the past two and half years. My passion is to code and really love to fix bugs which are high priority and need a quick fix. In this blog i'll post whatever i think is interesting and worth sharing in my day-to-day development. The technologies which i work on are HTML, CSS, Javascript, JQuery, CMS Technologies, Silverlight, WPF, WCF, LINQ, SQL, SSRS and other related technologies.

Let's hope everything goes fine and love to see you back to view my blog....
Track my blog for updates... Will be back with my stuff loaded in the further postings..
Bye for now...